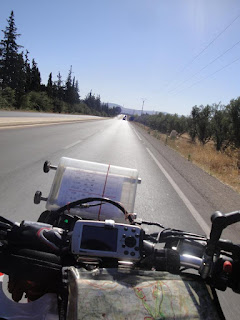
Come realizzare un porta-RoadBook semplice, leggero ed economico.
How to assemble a RoadBook-holder, simple, light and cheap.
Il porta Roadbook è un
accessorio indispensabile per la navigazione nei motorally. L'abbiamo
visto montato, insieme a una serie di strumenti (tripmaster,
iritrack,) sulle moto che corrono la Dakar.
In pratica è un supporto
per srotolare un foglio di carta su cui troviamo scritte le
indicazioni per trovare la giusta via da seguire.
Un altro utilizzo del
porta Roadbook lo si ha nei lunghi viaggi. Vi si possono segnare
varie indicazioni sulla tappa programmata: a quale chilometro è
previsto il rifornimento, a che punto possiamo trovare una zona di
interesse panoramico, l'albergo con le indicazioni, e quant'altro
riteniamo essere utile.
The roadbook-holder is an
essential accessory for navigation in motorally. We we are seen
mounted, along with a set of tools (trip master, Iritrack,...) on the
bikes that run the Dakar.
In practice it is a
support to roll out a sheet of paper on which are written the
directions to find the right way forward.
Another use of the
roadbook-holder has, is on long trips. There you can mark several
entries on the stage planned: at what kilometer is scheduled
refueling, to what extent can we find an area of scenic
interest, the hotel blends with the signs, and whatever we believe to
be useful.
Ma veniamo ora al come
fare.But now we come to the how.
Bisogna procurarsi:
scatola con coperchio
trasparente. 19cm larghezza, almeno 13cm di altezza e almeno 3,5cm di
profondità. La larghezza è calcolata in base alle dimensioni del
roadbook standard usato nelle competizioni.
un tubo in plastica lungo
almeno 40cm, che verrà tagliato.
due bulloni di diametro
inferiore alla parte cava del tubo in plastica, con due dadi e due
rondelle.
due rotelle in plastica
con impanatura di misura leggermente più grande della parte cava del
tubo in plastica.
un elastico per picchetti
da campeggio.
due staffe a L in acciaio
inox.
We must obtain:
1.box with transparent
lid. Width 19cm, at least 13cm in height and at least 3.5 cm deep.
The width is calculated based on the size of the standard road book
used in competition.
2.a plastic tube along at
least 40cm, that will be cut.
3.two bolts with a
diameter less than the hollow part of the plastic tube, with two nuts
and two washers.
4.two plastic rollers
with breading measuring slightly larger than the hollow part of the
plastic tube.
5.an elastic camping
pegs.
6.two L-brackets in
stainless steel.
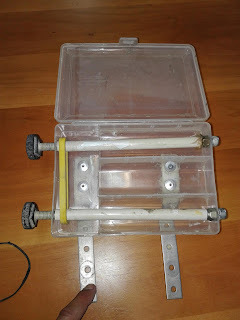
Fare due buchi, sia sul lato destro che sinistro, in modo che la distanza del buco dall'estremità del contenitore sia pari alla metà della profondità dello stesso.
Sul lato destro inserire dall'esterno i due bulloni con rondella, e serrarli con il dado.
Remove the parts that would hinder the rollers inside the box.
Make two holes, both on the left and right side, so that the distance of the hole from top and bottom of the container is equal to half the depth of the same.
On the right side from the outside enter the two bolts with washers, and tighten them with the nuts.
Prendere la misura della distanza rimanente dal dado all'estremità interna sinistra, e tagliare due sezioni del tubo in plastica pari a questa distanza.
Forzare avvitando le due rotelle in plastica in modo da creare l'impanatura all'interno delle sezioni di tubo stesse.
Inserire le estremitá senza impanatura nella parte sporgente dei bulloni sul lato destro.
Far passare i due tubi all'interno dell'elastico e avvitare in le rotelle in questi, avendo cura di inserire prima un po di colla, in modo che non si svitino mentre state guidando la moto.
Take the measurement of the remaining distance from the nut to the left internal end of the box, and cut two sections of plastic pipe equal to this distance.
Force tightening the two plastic rollers to create the breading inside pipe sections themselves.
Insert the extremities without breading on the protruding bolt on the right side.
Pass the two tubes by the rubber and screw wheels in these, taking care to insert a bit of glue, so that you do not unscrew while driving the bike.
Piegate le staffe in inox in modo da poterle agganciare al supporto dello strumento della moto e poter leggere il Roadbook sia da seduti che nella posizione in piedi.
Bend your brackets in steel so that you can attach to the tool holder of the bike and be able to read the roadbook either sitting position in the standing .
Il peso di quello che potete vedere è di circa 400gr.
The weight of the one you can see is about 400gr.
La funzione dell'elastico non è quella di far ruotare insieme i due assi, ma quella di impedire che si srotolino da soli con le vibrazioni del motore.
The function of the elastic is not to rotate along the two axes, but to prevent rotation with engine vibrations
Fate molta attenzione quando bucate la scatola che i due assi siano perfettamente paralleli, altrimenti scorrendo il roadbook si incastrerá su uno dei lati del contenitore.
Be very careful when pierced the box that the two axes are perfectly parallel, or swiping your road book will fit on one side of the container.
Per essere sicuri che il coperchio della scatola non si apra per le buche o le vibrazioni del motore, mettete un piccolo elastico all'esterno, che non copra il roadbook.
To be sure that the box cover is not opened to the hole or the vibrations of the engine, place a small rubber band on the outside, it does not cover the roadbook.
Le dimensioni suggerite sono da considerare le minime da utilizzare. Eccedere peró porterebbe ad un attrezzo goffo ed esposto agli urti nelle cadute.
The dimensions are suggested to consider the use of minimum. However go beyond lead to a clumsy tool and exposed to shocks in the falls.
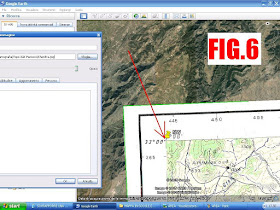
 Può capitare di dover gestire tracce e rotte in diversi formati per l'utilizzo su software e dispositivi GPS diversi. Può anche capitare di essere nella necessità di trasformare tracce in rotte o viceversa, perché magari il nostro dispositivo GPS è datato.


